Is Google Drive Almost Full? Here’s How You Can Make More Space
Is Google Drive Almost Full? Here's How You Can Make More Space
With 15GB of space free, Google Drive seems like an excellent deal compared to Box’s 2GB of space and Dropbox’s 10GB. However, there’s a caveat -the limit of 15GB includes the contents of your Gmail accounts (messages and attachments) and Google Photos.
Photos and emails pile up quickly, and you could be able to exceed the 15GB limit earlier than you anticipated.
It’s not challenging to locate the messages, files attachments, media. And other information consuming precious gigabytes and then reclaim the Google Drive space for yourself.
Table of Contents
Step 1: Determine The Root Of The Issue
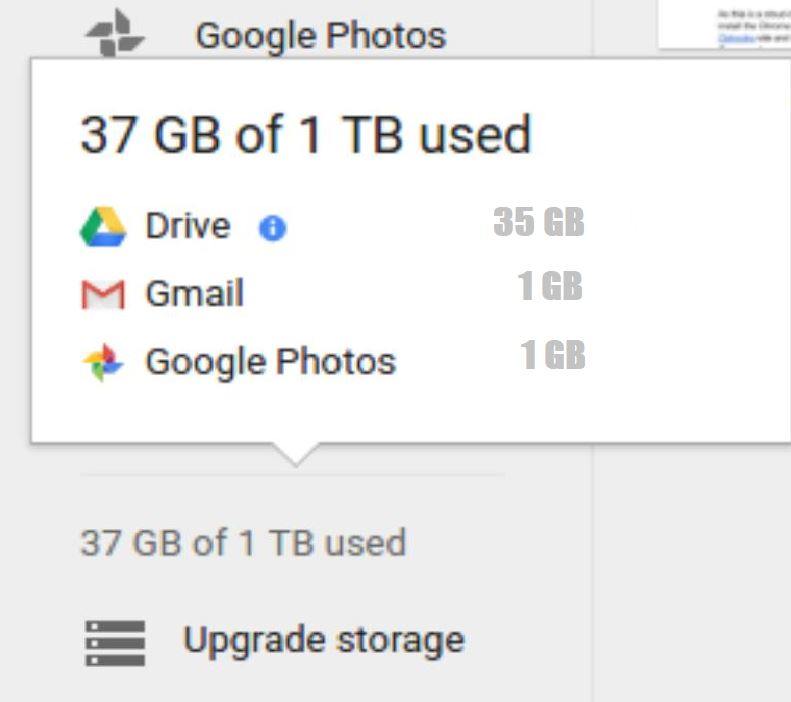
To discover why you’re taking up all the space in Google Drive, go to Google’s Drive storage page. You’ll see an image of a pie chart showing you the amount of space taken up. Click on the graph to see an overview of the data by platform.
It’s clear that the bulk of Google Drive space is entire with Gmail attachments and messages. But I also appear to have around 4GB with Google Photos.
This section will also check the total storage space you can store (including all bonuses or rewards you might have received). You can also increase the capacity of your Google One plan if you think you require more space. Google One plans begin at just $2 per month for 100GB, or $20 per year, and increase to 10 dollars per month for 2TB.
Step 2: What’s The Most Important Thing Towards Your Limit?
There’s no way to guarantee that everything you store in Your Google Drive counts toward your storage limit, so don’t wander in a rash manner of deletion of documents. Everything you create using Google Docs, Google Sheets, or Google Slides doesn’t count towards the limit (neither do any Google Doc or Sheet nor Slide that you share with anyone else). The majority of the content available in Gmail is adding up. However, only images larger than 248×248 pixels or videos that last longer than 15 minutes within your Google Photos count near your Drive storage limit.
Step 3: Clean Up Drive
Go to Google Drive and take a look through My Drive. If you find thumbnails in a grid instead of an actual list, tap on the List view button on the upper-right edge on the right.
Now you should be intelligent to see the Google Drive files listed and sort them by Name. Google was able to arrange your Drive files quickly according to the file size, but when you hit the Sort button in the upper right-hand corner, you’ll find that your only options for sorting are Name last modified, last altered by me—later used by me.
However, you can still sort your files according to file size. In the lower-left area of the screen, you’ll be able to see how much storage. You’re using and the option to purchase more storage. Move your cursor over the section until a box showing the breakdown of your Drive storage appears.
Read More: What should I do When MacBook Pro won’t turn on?
Your Drive folder will be sortable by “Quota employed” or the size of the file. And you’ll have the option of deleting the larger files to make space.
Should you own PDFs, you’d prefer not to delete them. You can preserve the files and save space by converting the files to Google Docs (or Sheets or Slides, based on the type of file). To do this, click right onto the file in PDF, move it over Open with, then select Google Docs from the drop-down menu.
A brand new Google Doc with the same name as the PDF file will open, and you will be able to delete the previously set aside PDF file.
After clearing those files off your Drive, you’ll need to empty your trash folder. Click Trash, choose the files you wish to erase forever, right-click, and click delete forever. When a file isn’t aloof for good, it will fill up your Drive.
Step 4: Take Care Of Your Google Photos
I rarely use Google, so how can I have four GB of photos stored in Google Photos? Because I use the automatic photo backup function of Android that uploads all photographs I snap on my Android mobile to my Google Photos account at full size.
However, it isn’t possible to browse Google Photos by file size; therefore, sorting through and getting rid of the storage users will require additional effort. To begin, visit Google Photos. Go to the Google Photos page and click Photos to display the entire collection of photos.
To erase photographs, hover them until a checkbox is visible in the upper-left corner. Click on the checkbox, and all your photos will be transparent with checkboxes. Check all images you wish to delete and click Delete to erase them.
To prevent your Android device from automatically downloading photos of full size, click the menu icon on the left-hand side, drive to Settings > formerly select High Quality. High-Quality images are smaller in size than those of your phone’s resolution, meaning they will take up very little space within Drive.
Step 5: Cleanse Your Gmail
If you’ve been through this far and you’re still here, then let’s be honest- your Gmail account. Is likely to take up the bulk of the available space on Google Drive. To clear your Gmail of bulky attachments and spam, look at our article about cleaning your Gmail. If you require assistance organizing your email to find older messages you no more want to keep, take a look at these tips to manage your Gmail.
Read More : Full form of TMC and Interesting Facts